domingo, 27 de janeiro de 2008

Play videos and webcam with desktop effects on


In this part i will show you how to be able to watch videos or turn on your webcam with the desktop effects turned on...

In first of all we go to:

Preferences> Main Menu> and in the preferences area we mark the Multimedia System selector, then in System Tools area we mark Configuration Editor, then we close the window.

Once again on the desktop we go to:

Preferences> Multimedia System Selector and we change the options to:

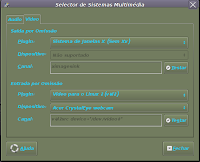
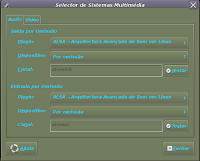
Audio: (See the example pictures)
In and Out Plugin: Alsa- Advanced Arquitecture of Sound in Linux
We change this in both options in the Audio area.

And in the video area:
In Plugin: X Window System (No XV)

Out plugin: Video for Linux 2 (V4|2)
Device: Acer CrystalEye Webcam

And with this configuration we sould be able to watch videos or start your webcam with the desktop effects on, alltough the webcam doesnt work 100% well but in trying to solve this aswell:)

In Configuration Editor if you want to have the System Icons in your desktop (like in Windows), go to:

Applications> > System Tools> Configuration Editor> Apps> Nautilus> Desktop
And we mark the icons we want to see in the desktop:)

Good Luck!

francisco Jácomo

Videos e webcam com desktop effects ligados


Aqui vou vos explicar como resolver o tal problema de só poderem ver videos e ligar a webcam com os desktop effects desligados...

Em primeiro de tudo vamos a:
Preferências> Menu principal> Ferramentas do sistema, e marcamos a casa que diz: Editor de configuração, depois nesse mesmo menu principal vamos a preferências e marcamos a casa que diz: Selector de Sistemas Multimédia, depois fechamos e saimos.

Depois vamos a Preferências> Selector de sistemas multimédia, e na aba Audio colocamos: (Vejam os exemplos ao lado)

Saida por omissão Audio: Alsa arquitectura avançada de som em linux.
Dispositivo : por omissão
Fazendo exactamente a mesma coisa na parte de entrada por omissão...

Passamos para a aba video:

Em saida por omissão colocamos
Em Plugin:
Sistema de janelas X (sem xv)

E em entrada por omissão:

Plugin: Video para o linux2 (V4|2)
Dispositivo: Acer CrystalEye Webcam

E com esta configuração já deverão de ser capazes de visualizar videos e ligar a Webcam sem ter que desligar os desktop effects, se bem que esta ultima ainda não funciona a 100%, mas estou a investigar esse tema e logo que eu saiba algo a respeito voçês tambem saberão:)

Se voçês quiserem os icones do sistema presentes no desktop (como no Windows), vamos a:

Aplicações> Ferramentas de sistema> Editor de configuração> Apps> Nautilus> Desktop e em desktop marcamos as casas dos icones que queremos ver no Ambiente de trabalho:)
Boa sorte para vocês!

Francisco Jácomo

domingo, 13 de janeiro de 2008

Como fazer um backup e restaurar o teu linux ubuntu:)


Assim que tiveres o teu pc em perfeitas condições, a primeira coisa que eu te aconselho a fazer é uma cópia de segurança, no caso de fazeres alguma coisa que possa danificar seu sistema operativo tu podes fazer o tempo voltar atrás e pôr o teu ubuntu tal como estava na altura do backup:)
A primeira coisa a fazer é abrir o terminal, em seguida:

Tornar-se root:
& sudo su
Senha :******

Mover para o arquivo Sistema /:
& cd /

E agora vamos fazer o backup usando o comando tar:
& tar -cvpzf /backup.tgz --exclude=/proc --exclude=/lost+found --exclude=/backup.tgz --exclude=/mnt --exclude=/sys --exclude=/media /

E o teu backup é criado na pasta / home:)
(demora um bocado,mas é normal!)
Se quiseres podes copiá-lo para uma outra partição para estar mais seguro, mas deixa o original em / home.

Se algo acontecer e quiseres restaurar o teu sistema use o seguinte comando:

Tornar-se root: (Para esta parte eu costumo fazer o login como root mas podes faze-lo como quiseres...)
& sudo su
Password :******

Vai para a raiz /:
& cd /

Em seguida, restaurar com:
& tar xvpfz backup.tgz-C /

E é só ver o teu sistema ser restaurado no terminal, uma vez que acaba reinicia o pc e ele deverá estar como era na altura do backup:)

(Muito importante!!!)
A primeira coisa a fazer ao fazer login é recriar as pastas que foram deixadas para trás:

& mkdir proc
& mkdir lost+found
& mkdir mnt
& mkdir sys
& mkdir media

E está tudo feito:) , há também uma forma de restaurar quando o sistema esta tão mal que não possas fazer login, através do live cd, mas isso explico mais tarde:)
Este tutorial foi baseado em:
http://www.guiaubuntupt.org/wiki/index.php?title=Backup_%26_Restaurar_o_sistema

How to make a backup in linux ubuntu


Once you have your laptop in perfect conditions the first thing that i advise you to do is to make a backup, in case that something goes wrong or you make something that would damage your operative system you can make the time go back and make your ubuntu just like when it was before:)
The first thing to do is to open the terminal, then:

Become Root:
& sudo su
Password:******

Move to the file sistem /:
& cd /

And now we going to make the backup using the tar command:
& tar -cvpzf /backup.tgz --exclude=/proc --exclude=/lost+found --exclude=/backup.tgz --exclude=/mnt --exclude=/sys --exclude=/media /

And your backup is done and saved in your /home folder:)
If you want you can copy it to another partition for safe keeping but leave the original in /home.

If something happends to your system and you want to restaure your system use the following command:

Become Root:
& Sudo su
Password:******

Move to /:
& cd /

Then restaure:
& tar xvpfz backup.tgz -C /

And just watch your system being restaured in the console, once it is done restart your sistem and it should be like it was at the time of the backup:)

Very important!!!
The first next thing to do once you log in is to recreate the folders that were left out of the backup:

& mkdir proc
& mkdir lost+found
& mkdir mnt
& mkdir sys
& mkdir media

And its done, theres also a way to restaure when you cant login in your system trough your live CD but that ill explain later:)
This how-to was based on:
http://www.guiaubuntupt.org/wiki/index.php?title=Backup_%26_Restau

quinta-feira, 3 de janeiro de 2008

Acer @ ubuntu 7.10 english.


In this blog I will explain step by step how to install the Linux Ubuntu 7.10 in Acer 5720 laptop, i have spend so many hours to get the intel 4965 AGN wireless card, the sound card Realtek HD Audio, the Acer crystal Eye webcam , or Compiz Fusion (the program for desktop effects) to work, although ultimately be quite simple, but as anyone who does not know is how those who do not see:) I like as many of you I am a beginner in linux so I will try to make everything as simple as possible ... I hope it will be of any help!

Francisco Jácomo

In 1 st place:

The 1 thing to do is to make a fresh ubuntu install, because in this linux is quite sensitive, I already had some instalations that for not having followed an concrete order in the post installation i couldnt get compiz to work after the install, so it is preferable to follow all steps as I indicate here to have guarantees of success:) In the first of what is necessary to update the ubuntu at 1 start-up, the 1 st thing that will notice is that your laptop has no sound, but do not worry because it is for short time: ) IMPORTANT (not install anything before update!) Once connected and updated go to sinaptics package manager and install the compiz, in my case I have also installed the following items: Compiz configuration settings manager; compiz core; compiz-fusion-plugins - extra; compiz-fusion-plugins-main; compiz-gnome and the other plugins, this part is at your will you install what you want... But once installed when you try to activate the desktop effects in System> Preferences> Appearance> Visual Effects, your laptop will show you the following message: "desktop effects can not be enabled ", thats because that the Intel graphics media accelerator X3100 graphics card is blacklisted due to problems of stability, but do not worry, you have easy solution, if you want to try this open the console (terminal ) and write:" SKIP_CHECKS = yes compiz "and see how desktop effects activate, but only when the console is open, once you close it they turn to normal effects again...
To solve this problem open the console and write:

$ sudo su

It will you ask for the password, write the password (doesnt shown anything when you write, but it works:)
Then:

$ Mkdir-p ~ / .config / compiz / & & echo SKIP_CHECKS = yes>> ~ / .config / compiz / compiz-manager

And the effects will be enabled, the reason for that is that we have created a directory that makes Ubuntu skip the graphical cards checks end enables compiz anyway:)

Let's go now to the sound part ...
Go to sinaptics manager>configurations> Repositories> Updates and mark "Unsupported Updates", and then open the console and write:

$ sudo apt-get install linux-backports-modules-generic ,if your distro is Ubuntu 7.10
Or
& sudo apt-get install linux-backports-modules-rt ,if you are running Ubuntu Studio 7.10

Then:

$ sudo gedit / etc / modprobe.d / alsa-base

Write your password...
And will open a text document, and then add the following at the end of the document:

Options snd-hda-intel model = acer

Save and close ...

Then restart the pc ...

If all went well when you login you will have sound:)

I advise you to at the end of this you unmark the Unsupported Updates due to problems with updates, but thats up to you ...

A problem less!

The webcam Acer Crystal Eye ..

To make the webcam work is much simpler than what you may think, the webcam driver is already included in Ubuntu 7.10 and in Hardware Information you can see that it is properly recognized, so the only thing we have to do is open the sinaptics manager and install the program "Cheese" so that we can start the webcam from the desktop or the menu, since this program is installed we will go to: Applications> Accessories> Cheese and the webcam will start (attention you will not be able to start the webcam or to watch movies unless we turn off the Desktop Effects ( Solved, later ill write it here) because it will not work, I have managed to solve this problem but I do not know as I have done that once i know ill write it here) ...
We can also install AMSN, which is the msn of Linux and with it we can send pictures of our webcams, as well as configure the sound, to operate the microphone of the laptop we have to click on the volume and open up the sound settings, we then go to Edit> Preferences> and mark all the marks that are not marked, then we go to: Record and rise all volumes to our liking and more importantly, we go next to Options and mark Front mic and thats it! We have sound and microphone:)

Now we just lack the wireless network...

To succeed in making the wireless to work I advise to install Ndiswrapper based in my own experience, although in Ubuntu the ilw4965 driver already is installed, as in the webcam, but in my opinion it does not work very well and niether the light of the wireless switch for on / off also does not work with that same driver, while with the ndiswrapper works as in the windows ...

We will go to sinaptic manager and install the Ndiswrapper common,ndisgtk, and ndiswrapper utils ...

Then open the console and write:

& sudo su
Password :******

$ gedit / etc / modprobe.d / blacklist

And will again open a text document for you to add at the end:

# Wireless network card driver
Blacklist iwl4965

Save and close...

On to the site of intel and we download the driver for windows XP that is available here:

Http://downloadcenter.intel.com/Detail_Desc.aspx?agr=N&ProductID=2753&DwnldID=13000&iid=homepage + dc_wireless_xp

Once we accomplish that we go to: System> Administration> Windows Wireless drivers and opens up a window, this window we go to: Install New Driver and go to where we have our drive (we unpack it before because that comes in Zip!), And install the driver: NETw4x32.INF and once the drive is installed restart your computer...
When you log on you can see the light of the wireless switch working:)


After we installed the driver we go to sinaptics again and install the program: Wifi Radar...
Then go to: Applications> Internet> Wifi Radar and create a profile with any name , I put in mine Auto, we save and if any wireless network is in your range it will now appear if we have the wireless switch in On position...

Only the mmc card reader i coldnt get to work, but at this time it sems that it does not work in Ubuntu, despite being recognized in Hardware Information, once i have news in this matter i will let you know!

I am available for any doubts that you all might have:)

Coment please in order for me to know that my work as been usefull!

PS: This is a blog that I am doing in my spare time so I cannot do it all at once, in case of any doubt do not hesitate to write it down in the comments area!

Linux Ubuntu 7.10 em Acer 5720 :) pt


Neste blog eu vou explicar passo a passo como conseguir instalar o Linux Ubuntu 7.10 no portátil Acer 5720, esta é a minha expêriencia, pois passei muitas muitas horas para conseguir pôr a placa de som Realtek HD Audio, webcam Acercrystal Eye e a placa de wireless Pro wireless 4965 AGN a funcionar, assim como o Compiz Fusion ( o programa de efeitos de desktop) a funcionar, apesar de afinal ser bastante simples, mas como quem não sabe é como quem não vê:) Eu, tal como muitos de vocês, sou um principiante em linux assim que vou tentar fazer tudo o mais simples possivel... Espero que vos sirva de ajuda!

Francisco Jácomo

Em 1º lugar:

O 1º a fazer será instalar o ubuntu de novo, pois nisso o linux é bastante sensivel, eu já tive instalações que por não ter seguido uma ordem concreta no pós instalação já não me funcionava o compiz, por isso é preferivel fazer os passos todos tal como eu indico aqui para ter garantias de sucesso:) Em primeiro de tudo é necessário actualizar o ubuntu logo no 1º arranque, a 1ª coisa que vão reparar é que o vosso pc não tem som, mas não se preocupem pois é por pouco tempo:) IMPORTANTE (não instalar nada antes de actualizar!!!) Uma vez ligado e actualizado vão ao sinaptics package manager e instalem o compiz no meu caso tenho instalado também os seguintes itens: Compiz configuration settings manager ; compiz core ; compiz-fusion-plugins-extra ; compiz-fusion-plugins-main ; compiz-gnome e os restantes plugins, isso fica ao vosso critério, ao tentar activar os desktop effects em Sistema>Preferências>Aparência>Efeitos visuais, o vosso portátil vais vos dizer "desktop effects cannot be enabled", isto por culpa da placa gráfica Intel media accelerator X3100, pois esta placa gráfica está na lista negra (blacklisted) devido a problemas de estabilidade, mas não se preocupem,tem fácil solução, se quiserem experimentar abram a consola (terminal) e escrevam: SKIP_CHECKS=yes compiz e verão como os efeitos ja se activam, mas apenas enquanto a consola estiver aberta, uma vez que a fechem adeus:)
Para resolver este problema abram a consola e escrevam:

$ sudo su (O cifrão não conta!)

Vai vos pedir a password, escrevam a password (não aparece nada ao escrever, mas escrevam normalmente que funciona:)
A seguir:

$ mkdir -p ~/.config/compiz/ && echo SKIP_CHECKS=yes >> ~/.config/compiz/compiz-manager

E com isto os efeitos já se ligam, e ligarão sempre que quiserem, pois fizeram um directório que sempre que se liga o compiz ele deixa de fazer o test á placa grafica e arranca logo de principio... Menos um problema:)

Vamos lá ao som agora...
Vão a sinaptics manager ( gestor de pacotes sinaptics) > Repositóries > Updates e marquem onde diz "Unsupported Updates", saiam e abram a consola e escrevam:

Em caso de Ubuntu 7.10:$ sudo apt-get install linux-backports-modules-generic
E se for o Ubuntu Studio 7.10: & sudo apt-get install linux-backports-modules-rt

Depois:

$ sudo gedit /etc/modprobe.d/alsa-base

põe a password
e vai se abrir um documento de texto, adicionam no fim do documento:

options snd-hda-intel model=acer

Guardam e fecham...

A seguir reiniciam o pc...

Se tudo correu bem ao reiniciar já temos som:)

Eu aconselho-vos a no final voltarem a desativar as Unsupported Updates devido a problemas com as actualizações, mas isso fica ao vosso critério...

Menos um problema!

A webcam Acer Crystal Eye...

Para fazer a webcam é muito mais simples do que inicialmente seria previsto, a drive da mesma já está incluida no Ubuntu 7.10 e na Hardware Information podemos ver que ela é correctamente reconhecida, assim que a unica coisa que teremos que fazer é abrir o sinaptics manager e instalar o programa "Cheese" de modo a podermos ligar a mesma desde o desktop ou do menu, uma vez que este programa esteja instalado vamos a: Aplicações> Acessórios> Cheese e ao clicar em cima a camara já liga ( atenção para ligar a camara assim como para podermos ver filmes teremos que desligar os Desktop Effects ( Já está resolvido, depois publico aqui!) pois com eles ligados não funciona, eu já consegui resolver esse problema mas não sei como o fiz, logo que saiba publico aqui )...
Também podemos instalar o AMSN, que é o msn do Linux e com ele já podemos enviar imagens das nossas webcams, assim como configurar o som, para nos funcionar o microfone do pc teremos que clicar no icone do volume 2 vezes e abre-se as configurações do som, vamos a Editar> Preferências> e marcamos todas as casas que não estejam marcadas, depois vamos a: A gravar e subimos todos os volumes ao nosso gosto e o mais importante, vamos a: Opções e nas opções pomos: Front Mic e já está!

Agora só falta o wireless... (O melhor é deixarem esta parte para o fim, experimentem o wireless com a driver que já vem no Ubuntu, a Iwl4965, e se preferirem deixem funcionar com essa mesma, a razão pela qual eu vos digo isto é porque em troca de nos funcionar a luz do comutador do wifi o ndiswrapper vai nos atrasar em alguns segundos o arranque do sistema, por isso eu aconselho, experimentem um e outro e decidam por vocês! Actualmente estou a usar a Iwl 4965...)

Para conseguirmos fazer o wireless a funcionar eu aconselho por experiência própria o programa Ndiswrapper, apesar de no Ubuntu a drive já estar instalada, tal como na webcam, mas na minha opinião não funciona muito bem e aparte a luz do wireless no comutador de on/off tb não funcionar com essa mesma drive, ao passo que com o ndiswrapper funciona tal como no windows...

Vamos a sinaptic manager e instalamos o Ndiswrapper common, ndisgtk e ndiswrapper utils...

Depois abrimos a consola e escrevemos:

& sudo su
Password:******

$ gedit /etc/modprobe.d/blacklist

E vai novamente abrir um documento de texto e adicionam no fim:

# wireless network card driver
blacklist iwl4965

Guardam e fecham...

Vamos ao site da intel e fazemos o download da drive para o windows XP que está disponivel aqui:

http://downloadcenter.intel.com/Detail_Desc.aspx?agr=N&ProductID=2753&DwnldID=13000&iid=homepage+dc_wireless_xp

Depois vamos a Sistema> Administração> Windows Wireless drivers e abre-se uma janela, nessa janela clicamos em Install New Driver e direcionamos para onde temos a nossa drive (temos que a descompactar antes pois vem em Zip!!! ) , e instalamos a drive com o nome: NETw4x32.INF e logo a seguir reiniciam o pc, logo ao ligar já poderemos ver a luz do comutador do wireless a funcionar:)

Depois vamos a sinaptics novamente e instalamos o programa: Wifi Radar, saimos de sinaptics e vamos a: Aplicações> Internet> Wifi Radar e ao abrir clicamos em New e criamos um perfil com um nome qualquer, eu no meu coloquei Auto, clicamos em gravar e já está, se houver alguma rede wireless ao nosso alcance já irá aparecer se tivemos o comutador do wireless em On, e já está:)

Só falta o leitor de cartões mmc, mas esse pelos vistos de momento não funciona em Ubuntu, apesar de estar reconhecido em Hardware Information, logo que tenha noticias a este respeito aviso!

Estou disponivel para qualquer duvida que voçes tenham:)

Comentem de modo a eu saber se este meu trabalho tem sido util para voces!!!

PS: Isto é um blog que eu estou a fazer nos meus tempos livres assim que não o posso fazer todo de uma vez, em caso de qualquer duvida não hesitem em deixar nos comentários!